Introduction

Getting ready to write a paper is like building the steel frame for a building. First, you need to choose your materials by generating ideas and questions as you did in the previous lesson. Next, you need to integrate your materials to build a structure. Whether writing an essay or a short story, nonfiction or fiction, you need a plan. Before you get started, however, let's take some time to review what you accomplished in the previous lesson. So far, you (1) determined your purpose and audience and (2) developed a topic by brainstorming ideas.
In this lesson, you will use the prewriting strategies of note-taking, graphic organizers, outlines, and lists to help you evaluate and organize your ideas for either an expository essay or a short story. There are two main reasons to use prewriting strategies.
First, they make a paper easier to write because prewriting strategies allow you to plan the organization and flow. Being organized allows you to focus on separate, shorter sections one at a time and feel confident that what you are writing will fit into the story or essay as a whole. This means that you will be less likely to wander off topic. You will also be able to evaluate what works and what doesn't and revise accordingly.
Second, your writing will be more reader friendly. As a writer, your ultimate goal should be to produce clear, informative, and interesting writing that engages your target audience.
Images used in this section:Source: Easi-edge safety barriers-geograph.org.uk-540015, Steve F, Wikimedia
Taking Good Notes

Let’s begin by finding out what you know and what you don’t know about the expository essay topic “The Great Texas Drought of 2011.” Several strategies can help you to figure out this information. The first strategy you will learn about is note-taking, something you have probably done in your classes. However, the Cornell system of note-taking, which you will learn, is a popular and effective note-taking method that may be new or different from your past experiences. This strategy isn’t the only way to take notes, but in this lesson, it’s the one we will use.
No matter what method you use to take notes, you need evidence from magazine or newspaper articles, reference books, websites, or other reliable sources. You might also choose to include personal anecdotes or conversations and interviews that you conducted with weather experts or people who experienced “The Great Texas Drought of 2011” firsthand.
Cornell Notes
To use the Cornell method of taking notes, you need to set up your notebook. You can use individual sheets of paper, but when possible, use a notebook. It will keep your notes together and in order. To begin setting up your notebook, follow these steps:
- If your notebook paper doesn’t include a line at the top, draw one as shown in the example below.
- Draw a dark horizontal line about six lines or two inches from the bottom of the page.
- Draw a dark vertical line about three inches from the left side of your notebook paper. Start at the top and stop at the bottom horizontal line you drew in the previous step.
- Write the name of the course, the title of the assignment, and the date on the top line of the page.
Note: We have created space for three main ideas in the example below, but you may have more or fewer for different topics.
|
||||||||||
It will also be helpful to keep these guidelines in mind:
- Use the column on the left to write main ideas.
- Use the column on the right to write notes.
- Skip a line between ideas and topics so they don’t get mixed up.
- Try not to use complete sentences; they take up a lot of space.
- Write a brief summary of the main ideas in the bottom section.
- Once you’re finished taking notes about the source material, check that what you have written makes sense to you.
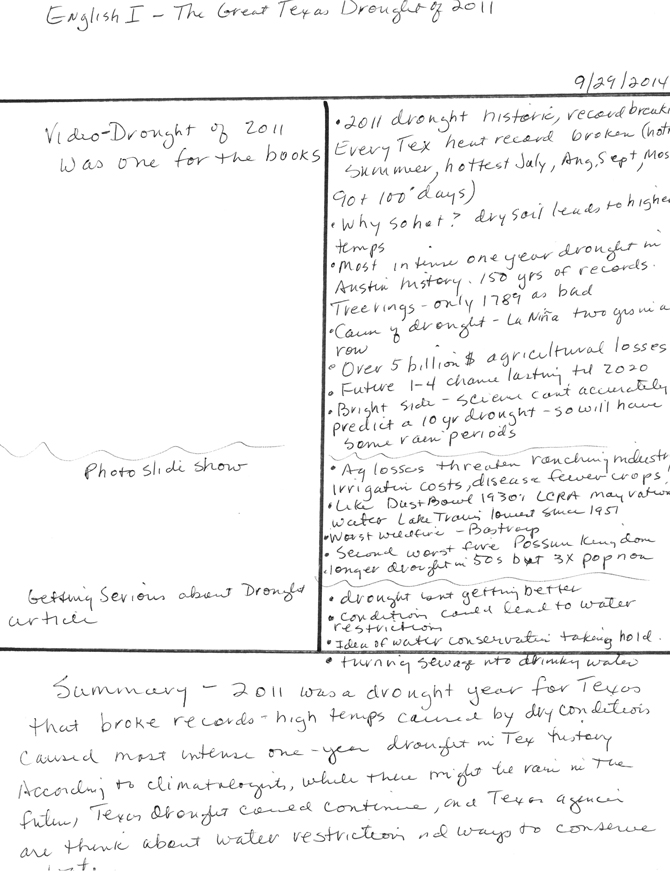
Let’s look at an example of how to use Cornell note-taking for writing an expository essay with the topic “The Great Texas Drought of 2011.” Click the link to download the Cornell Notes template. Keep it open to take notes on the three sources you are about to read. Pretend that you found these sources while conducting preliminary research on your topic: a news video, a photographic slide show, and a newspaper article.
Source 1
Watch this video segment about the drought from the previous lesson called “Generate Ideas and Questions.” For this first source, we listed the main ideas for you, but feel free to use the Cornell Notes handout to take notes about supporting details or other ideas that interest you in this video.

The main ideas from the video segment are as follows:
- 2011 drought may become long-term
- History-making drought that people will remember for a long time
- Every major Texas heat record was broken (including hottest summer ever, hottest month ever, hottest August temperature, most 90- and 100-degree days).
- Cause of heat: Dry soil leads to higher temperatures
- Cause of drought: Two years of La Niña
- In 150 years of record-keeping, Austin has never had a drier year.
- Texas Agriculture: worst losses in history, totaling five billion
- Climatologist: drought could last until 2020, similar to 1950s drought.
- Other scientists suggest that we can’t accurately predict a long-term drought and can expect rainy periods within a long drought.
Source 2
Take a look at the photographic montage about the drought. When you’re finished, use the Cornell Notes handout to write down the main ideas, supporting details, and anything else you found interesting.
Source 3
Finally, read this newspaper article about the drought. When you’re finished, use the Cornell Notes handout to write down the main ideas, supporting details, and anything else you found interesting.
AUSTIN, Tex.
SOMETHING odd happened here last week.
It rained.
But the relief, an answer to desperate prayers, is likely to be short-lived. The drought that has gripped much of Texas since the fall of 2010 shows few signs of abating soon. The latest forecasts say that parched West and South Texas will remain dry, and that the state is likely to see above-average temperatures this spring, increasing evaporation from already strained reservoirs. The conditions could lead to severe water restrictions in some parts of the state.
The implications have finally sunk in among lawmakers and business leaders here, who like to boast about the economic appeal of Texas’s low taxes and relaxed regulatory environment: no water equals no business. In a state fabled for its everything-is-bigger mentality, the idea of conserving resources is beginning to take hold. They are even turning sewage into drinking water.
—New York Times
Now that you have read and created notes for all three sources using the Cornell Notes handout, examine the image below to see how another student used Cornell Notes to collect information from the three sources.
When you find sources you plan to use in your essay, don’t forget to write down the authors, titles, locations, website addresses, journal names, dates published and any other important bibliographic information.This documentation will be important for locating the sources later and for listing them in the bibliography or references section of your essay.
For example, we wrote the information about the three sources above on the back of our notes so that this documentation wasn’t lost. To see the kinds of information we collected, review the sources below:

Images used in this section:Source: Cracked Lake, crowt59, Flickr
Dust Bowl 1935, MyEyeSees, Flickr
Source: Texas Parks and Wildlife, Texas Parks and Wildlife’s Photostream, Flickr
Source: Handwritten notes, IPSI
Source: Resources list, IPSI
Using Graphic Organizers
In addition to Cornell Notes, graphic organizers are another effective method for arranging your ideas. Graphic organizers are also called visual maps, mind maps, and visual organizers. The information that you include in them can be identical to the information you gather when taking notes, except that the information is organized visually.
Notice the way the vegetables are arranged in the photograph below. Each type of vegetable is grouped—carrots one place, lettuces another, and so on. This picture is a visual organizer in a sense because it visually arranges the vegetables. In this section, you will learn how to visually arrange information for the topic “The Great Texas Drought of 2011.”

One way to organize ideas for an essay is to use grouping—also known as mind mapping and concept webbing. These terms refer to ways of relating ideas to each other. Study the example below.

Do you see how the categories are organized? The subject, “The Great Texas Drought of 2011,” appears in the largest oval. We know this text is the subject or topic because every other oval connects to it either directly or indirectly. The main ideas appear in the blue ovals: “One of the worst in Texas history” and “May be the start of a longer drought.” These ovals connect directly to the subject. The supporting details appear in the red ovals: “5 billion agricultural dollars,” “All major heat records broken,” and “Could last until 2020.” These details connect to the two main ideas.

Study the relationships in the graphic organizer below. Decide whether each idea should be the subject, a main idea, or a supporting detail. When you have an answer in mind, drag and drop the idea into the correct oval.
After organizing our notes in a graphic organizer, let’s create a working outline. Did you notice that the structure of the two graphic organizers in this section created a visual outline? For example, the information from the first graphic organizer could be used to create a working, text-only outline that looks like this:
The Great Texas Drought of 2011
- One of the worst in Texas history
- All major heat records broken
- Five billion agricultural dollars lost in Texas
- May be the start of a longer drought
- Could last until 2020
You could have created the same outline using the topic, main ideas, and supporting details from your Cornell Notes page. It doesn’t matter whether you use notes or a graphic organizer to create an outline as long as the working outline helps you write the first draft of your paper. While you are writing the first draft, you may want to revise, change how ideas are arranged, or add new information. You can change your working outline in each and every instance. Who knows? Even your thesis may change!
That’s why this outline is called a “working” outline and not a “formal” or “final” outline; it can be revised over and over again. In fact, it’s important not to commit to a detailed plan that will discourage changes during the drafting process. You can develop a formal outline to serve as a checklist for logic, coherence, and unity in your paper after you finish writing the first draft.
Images used in this section:Source: Veggies, Calliope, Wikimedia
Source: Blowing Sand on Lakeshore, TexasEagle, Flickr
Making Lists

In this lesson, you have learned how to use note-taking, graphic organizers, and working outlines to plan an expository essay about “The Great Texas Drought of 2011.” Suppose your teacher asks you to write a short story about your experiences during the drought. In the second and third sections of this lesson, you collected factual information about the drought, but let’s think about what you will need to write a short story.
For starters, your story can be set in the past, the present, or the future. Since it’s fictional, you can include colorful characters and dialogue. You can also paint your own picture of the drought by using personal details in the writing. One way to develop ideas for your story is to make lists.
People organize their daily lives using to-do lists, grocery lists, and schedules. For this lesson, we will focus on listing as a prewriting strategy. Listing is an important part of the writing process because it can help you generate and organize ideas. One list-making method that some writers find helpful is to answer the Who, What, Where, When, Why, and How of your short story. Answering these questions can guide your thinking and note-taking.
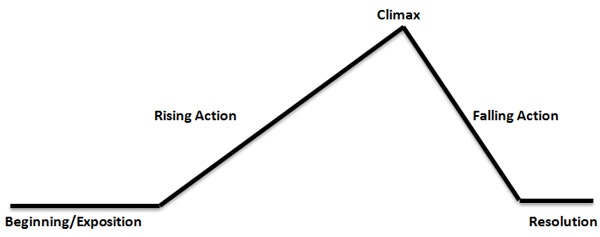
Because you are writing a short story, remember to follow the guidelines used in the short story writing process. These guidelines were covered in the previous lesson, “Generate Ideas and Questions,” but let’s review them. Typically, a short story includes these elements: a beginning, middle, and an ending. If this sounds simple—almost too simple—you are right; there is more to it. Other lessons in the Writing Strand cover literary devices that authors use to vary this structure. For this lesson, however, you will use these basic parts of a short story:
- The beginning, or introduction, is where the characters and the setting are presented; the explanation of the plot or exposition occurs in the beginning.
- The middle includes actions or events in which the conflict of the story is exposed; rising action and the climax—or the turning point of the story—both occur in the middle. The falling action—where the conflict begins to be resolved—also occurs in the middle.
- The ending can also be referred to as the denouement; the conflict is resolved and the action comes to a close in the ending.
This diagram illustrates the three parts of a short story.
You should be ready to write your story! In the future, when your teacher assigns an essay or short story, you will have strategies to organize your ideas. Using your notes, make a list of the strategies mentioned in this lesson. When you are finished, check your understanding.
Images used in this section:Source: Drought & MD Farming - Hurlock, MD, Step It Up 2000, Flickr
Resources
“Drought of 2011 was one for the books.” KXAN. YouTube, 3:22. Posted October 17, 2011. //www.youtube.com/watch?v=UsIan4b5f_c.
Galbraith, Kate. “Getting Serious About a Texas-Size Drought.” The New York Times, April 6, 2013. //www.nytimes.com/2013/04/07/sunday-review/getting-serious-about-a-texas-size-drought.html?_r=0
Texas Parks and Wildlife. Texas Parks and Wildlife’s Photostream, Flickr. Accessed January 5, 2012. //www.flickr.com/photos/texasparkswildlife/sets/.